Wednesday, January 16, 2013

I can guess the answer

Hi

I'm so sorry I haven't written for so long. My work keeps me so busy that I never have one minute for myself. Any way, I'm now here with a new game. It can guess the answer which you have selected by asking some questions.


You can play now:


You can download the game from here.

You can have this game anywhere just by adding the 'guess.js' script. Since it is a jquery based game, so you should also add jquery script in your page. Then, you should call the main method. The following sample shows you how to do it:

1    <html> 
2    <head> 
3        <script type="text/javascript" src="http://code.jquery.com/jquery-1.9.0.min.js"></script> 
4        <script type="text/javascript" src="js/guess.js"></script> 
5        <script type="text/javascript"> 
6            $(function () { 
7                $("#guess").guessAnswer(); 
8            }); 
9        </script> 
10   </head> 
11   <body> 
12   <div id="guess"></div> 
13   </body> 
14   </html>


You can also add your own questions and answers dynamically. Following sample shows you how to do it:

1    <html> 
2    <head> 
3        <script type="text/javascript" src="http://code.jquery.com/jquery-1.9.0.min.js"></script> 
4        <script type="text/javascript" src="js/guess.js"></script> 
5        <script type="text/javascript"> 
6            $(function () { 
7                $("#guess").guessAnswer([ 
8                    {id:87, question:"Is it an electronic device?", level:2} 
9                ], 
10                       [ 
11                           {answer:"Book", positiveAnswerQuestions:[1, 7, 16, 26, 29, 39, 40, 41, 43, 77]}, 
12                           {answer:"Computer", positiveAnswerQuestions:[1, 87, 35, 39, 40, 41, 46]} 
13                       ]); 
14           }); 
15       </script> 
16   </head> 
17   <body> 
18   <div id="guess"></div> 
19   </body> 
20   </html>


I hope you enjoy it.

Tuesday, July 17, 2012

Number to Persian letters text


Hey

In every financial systems we should show the letter version of numbers particularly in prints. It is also very useful for large numbers to understand it. For example if you see this number in digits "900025235" you can't catch how much it is exactly in short view but not in letters "Nine hundred million twenty five thousand two hundred and thirty five".

I think Persian digits letters are one of the most difficult ones in the different languages. Today we are trying to handle this. First take a look here:


1.Usage
Our mission is to change the input hint whenever its value is changed. To register that to your input you should pass these steps:
  1. include jquery framework to your page
  2. include number.to.persian.letters.js to your page
  3. register your input to the engine on this way:
        <script type="text/javascript"> 
            $(function() { 
                $(".toLetter").numberToLetter(); 
            }); 
        </script> 
    
According above scripts, all inputs with the class of "toLetter" register the "number to Persian letters" engine.

2.How it works
First take a look to the file number.to.persian.letters.js:
1    /** 
2     * number.to.persian.letters.js 
3     * @author: Mostafa Rastgar 
4     * @version: 1.0.0 
5     * 
6     * Created by Mostafa Rastgar on 2012-07-11. Please report any bug at http://prgassist.blogspot.com/ 
7     * 
8     * Copyright (c) 2012 Mostafa Rastgar  http://prgassist.blogspot.com/ 
9     * 
10    * 
11    */ 
12   $(function($) { 
13       var names = {"0": {value:"\u0635\u0641\u0631", scale:false}, 
14           "1": {value:"\u064a\u06a9", scale:false}, 
15           "2": {value:"\u062f\u0648", scale:false}, 
16           "3": {value:"\u0633\u0647", scale:false}, 
17           "4": {value:"\u0686\u0647\u0627\u0631", scale:false}, 
18           "5": {value:"\u067e\u0646\u062c", scale:false}, 
19           "6": {value:"\u0634\u0634", scale:false}, 
20           "7": {value:"\u0647\u0641\u062a", scale:false}, 
21           "8": {value:"\u0647\u0634\u062a", scale:false}, 
22           "9": {value:"\u0646\u0647", scale:false}, 
23           "10": {value:"\u062f\u0647", scale:false}, 
24           "11": {value:"\u064a\u0627\u0632\u062f\u0647", scale:false}, 
25           "12": {value:"\u062f\u0648\u0627\u0632\u062f\u0647", scale:false}, 
26           "13": {value:"\u0633\u064a\u0632\u062f\u0647", scale:false}, 
27           "14": {value:"\u0686\u0647\u0627\u0631\u062f\u0647", scale:false}, 
28           "15": {value:"\u067e\u0627\u0646\u0632\u062f\u0647", scale:false}, 
29           "16": {value:"\u0634\u0627\u0646\u0632\u062f\u0647", scale:false}, 
30           "17": {value:"\u0647\u0641\u062f\u0647", scale:false}, 
31           "18": {value:"\u0647\u062c\u062f\u0647", scale:false}, 
32           "19": {value:"\u0646\u0648\u0632\u062f\u0647", scale:false}, 
33           "20": {value:"\u0628\u064a\u0633\u062a", scale:false}, 
34           "30": {value:"\u0633\u064a", scale:false}, 
35           "40": {value:"\u0686\u0647\u0644", scale:false}, 
36           "50": {value:"\u067e\u0646\u062c\u0627\u0647", scale:false}, 
37           "60": {value:"\u0634\u0635\u062a", scale:false}, 
38           "70": {value:"\u0647\u0641\u062a\u0627\u062f", scale:false}, 
39           "80": {value:"\u0647\u0634\u062a\u0627\u062f", scale:false}, 
40           "90": {value:"\u0646\u0648\u062f", scale:false}, 
41           "100": {value:"\u0635\u062f", scale:false}, 
42           "200": {value:"\u062f\u0648\u064a\u0633\u062a", scale:false}, 
43           "300": {value:"\u0633\u064a\u0635\u062f", scale:false}, 
44           "400": {value:"\u0686\u0647\u0627\u0631\u0635\u062f", scale:false}, 
45           "500": {value:"\u067e\u0627\u0646\u0635\u062f", scale:false}, 
46           "600": {value:"\u0634\u0634\u0635\u062f", scale:false}, 
47           "700": {value:"\u0647\u0641\u062a\u0635\u062f", scale:false}, 
48           "800": {value:"\u0647\u0634\u062a\u0635\u062f", scale:false}, 
49           "900": {value:"\u0646\u0647\u0635\u062f", scale:false}, 
50           "1000": {value:"\u0647\u0632\u0627\u0631", scale:true}, 
51           "1000000": {value:"\u0645\u064a\u0644\u064a\u0648\u0646", scale:true}, 
52           "1000000000": {value:"\u0645\u064a\u0644\u064a\u0627\u0631\u062f", scale:true}, 
53           "1000000000000": {value:"\u062a\u064a\u0644\u064a\u0627\u0631\u062f", scale:true}, 
54           "1000000000000000": {value:"\u06a9\u0627\u062a\u064a\u0644\u064a\u0627\u0631\u062f", scale:true} 
55       }; 
56       $.fn.numberToLetter = function() { 
57           $(this).change(function() { 
58               numberChange($(this)); 
59           }); 
60           numberChange($(".toLetter")); 
61       } 
62       function numberChange(input){ 
63           var value = input.val(); 
64           input.attr({title:numberToLetter(value)}); 
65       } 
66       function numberToLetter(value) { 
67           value = value.replace(/(\d)(?=(\d\d\d)+(?!\d))/g, "$1,"); 
68           var parts = value.split(","); 
69           var textParts = new Array(); 
70           for (var i = 0; i < parts.length; i++) { 
71               var setScale = renderNumber(parts[i], textParts); 
72               if (setScale) { 
73                   renderScale((parts.length - i - 1), textParts); 
74               } 
75           } 
76    
77           var text = concatNumberTexts(textParts); 
78           if (text == "" && value != "") { 
79               return names["0"].value; 
80           } else { 
81               return text; 
82           } 
83       } 
84    
85       function concatNumberTexts(renderRepository) { 
86           var text = ""; 
87           for (var i = 0; i < renderRepository.length; i++) { 
88               if (text != "") { 
89                   text += " "; 
90               } 
91               if (text != "" && allowComman(renderRepository[i])) { 
92                   text += "\u0648 "; 
93               } 
94               text += renderRepository[i]; 
95           } 
96           return text; 
97       } 
98    
99       function renderScale(scaleIndex, renderRepository) { 
100          var section = pow(scaleIndex * 3); 
101          if (section > 1) { 
102              renderRepository.push(names[section.toString()].value); 
103          } 
104      } 
105   
106      function renderTwoLengthNumber(num1, num2, renderRepository, setScale) { 
107          if (num1 == "1") { 
108              renderRepository.push(names[num1 + num2].value); 
109              setScale = true; 
110          } else { 
111              if (num1 != "0") { 
112                  renderRepository.push(names[num1 + "0"].value); 
113                  setScale = true; 
114              } 
115              if (num2 != "0") { 
116                  renderRepository.push(names[num2].value); 
117                  setScale = true; 
118              } 
119          } 
120          return setScale; 
121      } 
122   
123      function renderNumber(digit, renderRepository) { 
124          var setScale = false; 
125          if (digit.length > 2) { 
126              if (digit.charAt(0) != "0") { 
127                  renderRepository.push(names[digit.charAt(0) + "00"].value); 
128                  setScale = true; 
129              } 
130              setScale = renderTwoLengthNumber(digit.charAt(1), digit.charAt(2), renderRepository, setScale); 
131          } else if (digit.length > 1) { 
132              setScale = renderTwoLengthNumber(digit.charAt(0), digit.charAt(1), renderRepository, setScale); 
133          } else if (digit.length > 0) { 
134              if (digit.charAt(0) != "0") { 
135                  renderRepository.push(names[digit.charAt(0)].value); 
136                  setScale = true; 
137              } 
138          } 
139          return setScale; 
140      } 
141   
142      function allowComman(txt) { 
143          for(var key in names){ 
144              if(names[key].value == txt){ 
145                  return !names[key].scale; 
146              } 
147          } 
148          return true; 
149      } 
150   
151      function pow(powNum) { 
152          var pow = 1; 
153          for (var j = 0; j < powNum; j++) { 
154              pow = pow * 10; 
155          } 
156          return pow; 
157      } 
158  }); 
159  
we should have a map with digit key and the value is the written version of the key. This map is for translation usage(line 13).
2.1 numberToLetter function (line 66)
This is the major function to handle the job. In line 67 we categorize every three digits near together into a category. This is the scales like thousand, million, billion, ... . parts in line 68 is an array of 3 digits. textParts in line 69 is the translated version of parts. renderNumber in line 71 will fill textParts(refer to 2.2). finally the textParts items should be joined together in line 77(refer to 2.4).

2.2 renderNumber function (line 123)
This function renders the letter and fill it to the 'renderRepository' parameter. Then returns a boolean to say if the scale should be rendered or not. If 3 zeros are near to each other the scale should not be rendered. For example 324000122.

2.3 renderTwoLengthNumber function (line 106)
This function should render two digits (num1, num2). There is a lot of exceptions between 10-20 in Persian. So we should handle this in here(lines 107,108). This function also fill the rendered text into the 'renderRepository'.

2.4 concatNumberTexts function (line 85)
This function concats the 'renderRepository' parameter items(textParts variable in numberToLetter function) together and returns full text. In Persian we shouldn't put 'and' after scales. So we should handle it here(lines 91,92).

You can download the client sample from here.

Tuesday, February 21, 2012

Multi-level jquery right to left menu

Hey ...
Horizontal dropdown main menu is one the most useful components for every sites or web applications. There are several jquery plug-in menus which build menu from UL/LI tags and work so good with various animations and effects. But always they have a problem for right to left web applications such as Arabic or Persian web applications. Most of the menus don’t work from right to left direction as well as from the left to right direction (the default orientation). So here I’m going to build a simple and complete multi-level right to left dropdown menu.
So let’s do it…
There are some rules which should be followed:
  • The menu should be generated from UL/LI tags
  • The first level should be horizontal and the other sub-level should be vertical
  • The menu items should be free and the user can assign it his/her customize CSS class
  • The content of menu items should be handle by user
  • The sub-menus should appear at the bottom of the item for the first level and for the other levels should appear at right side of the selected parent item
  • The sub-menus should vanish after specific time in milliseconds by leaving the parent item
The scenario is like this:
  • The user should make its own UL/LI tags with content
  • The UL/LI should be in the middle of a div tag with specific id and at least “jquerycssmenu” CSS class(it can have more extra classes)
  • There are some parameters which can be changed before generating menu such as: “jquerycssmenu. arrowimages”, “arrowimages. fadesettings”, “arrowimages. isRTL”. For switches of them refer to “jquerycssmenu.js “ to configure them
  • Finally, call “jquerycssmenu.buildmenu(divId);” on page load
The javascript code is available here:
1) var jquerycssmenu = {
2) arrowimages : {down:['downarrowclass', 'arrow-down.gif', 25], right:['rightarrowclass', 'arrow-left.gif']},
3) //duration of fade in/ out animation and the starting fade out delay, in milliseconds
4) fadesettings: {overduration: 350, outduration: 100, startfadeoutdelay:300},
5) // you can set it false and if you set it to false the sub menu positionning will be ok but you should
6) // change arrow incons position to the left side manually and .jquerycssmenu UL LI { float:left} should be set
7) isRTL : true,
8) buildmenu:function(menuid) {
9) jQuery(document).ready(function($) {
10) var mainmenu = $("#" + menuid + ">ul");
11) var headers = mainmenu.find("ul").parent();
12) headers.each(function(i) {
13) var curobj = $(this);
14) var subul = $(this).find('ul:eq(0)');
15) var inMenu = false;
16) this._dimensions = {w:this.offsetWidth, h:this.offsetHeight, subulw:subul.outerWidth(), subulh:subul.outerHeight()};
17) this.istopheader = curobj.parents("ul").length == 1 ? true : false;
18) subul.css({top:this.istopheader ? this._dimensions.h + "px" : 0});
19) /*for isRTL : false set it to paddingRight*/
20) curobj.children("a:eq(0)").css(this.istopheader ? {paddingLeft: jquerycssmenu.arrowimages.down[2]} : {}).append(
21) '<img src="' + (this.istopheader ? jquerycssmenu.arrowimages.down[1] : jquerycssmenu.arrowimages.right[1]) + '" class="' + (this.istopheader ? jquerycssmenu.arrowimages.down[0] : jquerycssmenu.arrowimages.right[0]) + '" style="border:0;" />');
22) curobj.hover(function(e) {
23) inMenu = true;
24) var targetul = $(this).children("ul:eq(0)");
25) this._offsets = {left:$(this).offset().left, top:$(this).offset().top};
26) var menuleft = this.istopheader ? this._dimensions.subulw - this._dimensions.w - 15 : this._dimensions.w;
27)
38) if (jquerycssmenu.isRTL) {
39) menuleft = (this._offsets.left < this._dimensions.subulw) ? (this.istopheader ? -(this._dimensions.subulw - this._dimensions.w) : this._dimensions.subulw ) : -menuleft;
30) } else {
31) menuleft = (this._offsets.left + menuleft + this._dimensions.subulw > $(window).width()) ? (this.istopheader ? -this._dimensions.subulw + this._dimensions.w : -this._dimensions.w) : menuleft;
32) }
33)
34) targetul.css({left:menuleft + "px"}).fadeIn(jquerycssmenu.fadesettings.overduration);
35) }, function(e) {
36) inMenu = false;
37) var li = $(this);
48) setTimeout(function() {
49) if (!inMenu) {
40) li.children("ul:eq(0)").fadeOut(jquerycssmenu.fadesettings.outduration)
41) }
42) }, jquerycssmenu.fadesettings.startfadeoutdelay);
43) });
44) });
45) mainmenu.find("ul").css({display:'none', visibility:'visible'});
46) });
47) }
58) };
As you can see everything happens in “buildmenu” method. So let’s take a look to it.
First of all we should find all LIs containing sub-menu(UL) in the middle of them from level 2 (lines 10, 11). Then we should iterate all of them to position their sub-menus at the right place relatively their parent item and handle mouseove and mouseout events to show or hide the sub-menu. We should find the sub-menu(line 14).
“inMenu” is a flag which determine if the mouse cursor is in the menu area or not (line 15). We set it to true in moseover and false in mouseout. In mouseout we don’t hide the sub-menu immediately. After a specific delay we do it to have more user-friendly result (line 42). You can comment “setTimeout(function() {” and “}, jquerycssmenu.fadesettings.startfadeoutdelay);” then check the result. You will find the menu without these lines so user-enemy on sub-menus navigation.
“_dimensions” is a map containing the selected element (LI) and it’s submenu width and height (line 16)
“istopheader” is a flag to determine if the selected item is top level or not(line 17). We should have a different strategy in sub-menu positioning if the selected item is top level or not.
Then we should set the top position of the sub-menu and place an arrow image into the parent of it (lines 18 to 21)
Then we should handle the mouseover and mouseout events. We do it by hover jquery API. The first argument is mouseover and the second argument is mouseout (line 22)
In mouseover function we should set the sub-menu left postion and make it to be shown (lines 25 to 32)
In mouseout function we should make the sub menu to be hidden (line 40)
At the last step of “buildmenu” API we should hide all of the ULs (line 45)
To have a more user-friendly user interface result we should prepare a CSS to illustrate ULs/LIs and A tags. I do it on this way:
.jquerycssmenu {
PADDING-LEFT: 15px;
FONT: bold 12px Verdana;
}
.jquerycssmenu UL {
PADDING-BOTTOM: 0px;
LIST-STYLE-TYPE: none;
MARGIN: 0px;
PADDING-LEFT: 0px;
PADDING-RIGHT: 0px;
PADDING-TOP: 0px
}
.jquerycssmenu UL LI {
POSITION: relative;
DISPLAY: inline;
/*for isRTL : false set it to left*/
FLOAT: right
}
.jquerycssmenu UL LI A {
BACKGROUND: #eff0ff;
PADDING-BOTTOM: 4px;
PADDING-LEFT: 7px;
PADDING-RIGHT: 7px;
DISPLAY: inline-block;
/*for isRTL : false set it to ltr*/
DIRECTION: rtl;
COLOR: #2d2b2b;
MARGIN-RIGHT: 3px;
TEXT-DECORATION: none;
PADDING-TOP: 5px
}
.jquerycssmenu UL LI A:hover {
BACKGROUND: #eff9ff;
COLOR: black
}
.jquerycssmenu UL LI UL {
Z-INDEX: 1;
POSITION: absolute;
DISPLAY: block;
VISIBILITY: hidden;
BORDER-BOTTOM: black 1px solid;
LEFT: 0px
}
.jquerycssmenu UL LI UL LI {
DISPLAY: list-item;
FLOAT: none;
}
.jquerycssmenu UL LI UL LI UL {
TOP: 0px
}
.jquerycssmenu UL LI UL LI A {
BORDER-BOTTOM: #778 0px solid;
BORDER-LEFT: #778 1px solid;
BORDER-RIGHT: #778 1px solid;
BORDER-TOP: #778 1px solid;
PADDING-BOTTOM: 4px;
MARGIN: 0px;
PADDING-LEFT: 5px;
WIDTH: 160px;
PADDING-RIGHT: 5px;
FONT: 13px Verdana;
/*for isRTL : false set it to ltr*/
DIRECTION: rtl;
BACKGROUND: white;
COLOR: black;
PADDING-TOP: 4px
}
.jquerycssmenu UL LI UL LI A:hover {
BACKGROUND: #eff9ff;
COLOR: black
}
.downarrowclass {
POSITION: absolute;
TOP: 7px;
/*for isRTL : false set it to right: 5px */
LEFT: 5px
}
.rightarrowclass {
POSITION: absolute;
TOP: 5px;
/*for isRTL : false set it to right: 5px */
LEFT: 5px
}
That’s it. Now we have a multi-level right to left dropdown menu.
You can download the js, css and sample html file from here.

all rights reserved by Mostafa Rastgar and Programmer Assistant weblog

Wednesday, November 2, 2011

Persian Textbox

Hey...
Please take a look to these input boxes


At the first look, they are simple inputs. But they are not.
Try to write something on them. Yes the language will switch to Persian mode automatically. But your O.S. keyboard language stays on its old state.
Know press Alt+Ctrl. The language will change(if not try more and more until success).
Here I'm going to describe how I did this.
On the first step you should include the related js file like this:
<script type="text/javascript" src="persiankeyboard.js"></script>
Then your inputs should handle onkeydown and onkeypress javascript events(the read parts) like this:
<input type="text" onkeydown="switchTextLang(this, event)" dir="rtl" onkeypress="keyEnterToPersian(this, event)" lang="fa"/>
<textarea onkeydown="switchTextLang(this, event)" dir="rtl" onkeypress="keyEnterToPersian(this, event)" rows="10" lang="fa" cols="10"></textarea>
The last step is optional but I recommend you to do it to feel better. Its better to set dir and lang fields of your inputs(the yellow parts).
OK that's it. You have Persian input box.
Know the script logic:
The script logic is so simple. It contains three major functions.
  • keyEnterToPersian
    this function converts the input key to Persian character. There is an array containing Persian character key code in hexadecimal ordering by their equivalent English character key code. Please take a look to the array:
    var keys = [
    0x0020, 0x0021, 0x061B, 0x066B, 0xFDFC, 0x066A, 0x060C, 0x06AF,
    0x0029, 0x0028, 0x002A, 0x002B, 0x0648, 0x002D, 0x002E, 0x002F,
    0x06F0, 0x06F1, 0x06F2, 0x06F3, 0x06F4, 0x06F5, 0x06F6, 0x06F7,
    0x06F8, 0x06F9, 0x003A, 0x06A9, 0x003E, 0x003D, 0x003C, 0x061F,
    0x066C, 0x0624, 0x200C, 0x0698, 0x064A, 0x064D, 0x0625, 0x0623,
    0x0622, 0x0651, 0x0629, 0x00BB, 0x00AB, 0x0621, 0x0654, 0x005D,
    0x005B, 0x0652, 0x064B, 0x0626, 0x064F, 0x064E, 0x0670, 0x064C,
    0x0653, 0x0650, 0x0643, 0x062C, 0x005C, 0x0686, 0x00D7, 0x0640,
    0x200D, 0x0634, 0x0630, 0x0632, 0x06CC, 0x062B, 0x0628, 0x0644,
    0x0627, 0x0647, 0x062A, 0x0646, 0x0645, 0x067E, 0x062F, 0x062E,
    0x062D, 0x0636, 0x0642, 0x0633, 0x0641, 0x0639, 0x0631, 0x0635,
    0x0637, 0x063A, 0x0638, 0x007D, 0x007C, 0x007B, 0x007E];
    The equivalent Persian key code of input key code is "keys[key - 32]". Because the key code range that we should handle them are between 32(space) up to 127 which will be 0 up to 95 in array index.
  • pnhMozStringInsert
    This function is for Mozilla browsers to substitute the input key with its equivalent Persian character in the right position. It will find selection start and end and scroll top and left(for textarea) to insert the substituted character in the right position. In IE browsers we can set the calculated Persian key code directly in "event.keyCode" and it works. I did it in keyEnterToPersian function.
  • switchTextLang
    This function sets input language state. This will switch the language by handling Alt+Ctrl key down. It do it on this way:
    var event = document.all ? window.event : event;
    if (event.ctrlKey && event.altKey)

    .... 
You can download the client side sample from here.
I hope to solve end user Farsi typing of Persian developer problem by creating this tool.
Enjoy yourselves.
all rights reserved by Mostafa Rastgar and Programmer Assistant weblog

Sunday, July 17, 2011

Design Patterns2(Abstract Factory, Bridge, Facade)

Hey ...

Do you remember my past post about design patterns? Here I'm going to continue it.

4. Abstract Factory
4.1. Pattern Goal
The abstract factory pattern is a software design pattern that provides a way to encapsulate a group of individual factories that have a common theme. In normal usage, the client software creates a concrete implementation of the abstract factory and then uses the generic interfaces to create the concrete objects that are part of the theme. The client does not know (or care) which concrete objects it gets from each of these internal factories since it uses only the generic interfaces of their products. This pattern separates the details of implementation of a set of objects from their general usage.

In software development, a factory is the location in the code at which objects are constructed. The intent in employing the pattern is to insulate the creation of objects from their usage. This allows for new derived types to be introduced with no change to the code that uses the base class.

Use of this pattern makes it possible to interchange concrete implementations without changing the code that uses them, even at runtime. However, employment of this pattern, as with similar design patterns, may result in unnecessary complexity and extra work in the initial writing of code. Used correctly the "extra work" pays off in the second implementation of the factory.
4.2 Pattern Detail
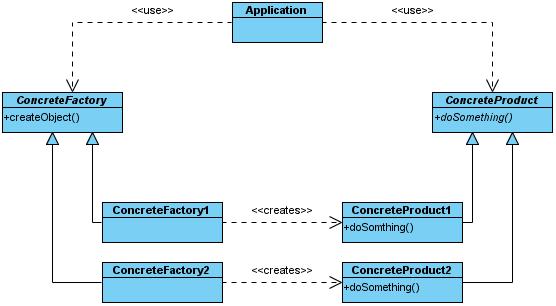
In this pattern we should have 2 kinds of interfaces and classes. 1: Concrete Products 2:Concrete Factories
Please take a look to this class diagram:
as you see there are two kinds of classes. Factory classes are responsible for creation their own class. Client(Application) should only uses ConcreteFactory class and retrieve an object type of ConcreteProduct class.
4.3 Pattern sample
In this sample we want to have a block to support templates. We place a key property containing template name. When we change the template key to green or blue, the block color should change its color. To do that we need 2 interfaces:
public interface Panel {
    public String paint(String value);
}
public interface PanelFactory {
    public Panel createPanel();
}
two classes should implement Panel. Each class should implement its own color:
public class GreenPanel implements Panel{
    public String paint(String value) {
        return "<div style='border-width:1px; border-color:green; border-style:solid; margin:2px; padding:2px; color:green'>" + value + "</div>";
    }
}
public class BluePanel implements Panel{
    public String paint(String value) {
        return "<div style='border-width:1px; border-color:blue; border-style:solid; margin:2px; padding:2px; color:blue'>" + value + "</div>";
    }
}
And two classes should implement PanelFactory:
public class BluePanleFactory implements PanelFactory{
    public Panel createPanel() {
        return new BluePanel();
    }
}
public class GreenPanelFactory implements PanelFactory{
    public Panel createPanel() {
        return new GreenPanel();
    }
}
Now its join time. we should make a class to use a PanelFactory to create a Panel object and use its method:
public class PageUIManager {
    Panel panel;

    public PageUIManager(PanelFactory panelFactory) {
        this.panel = panelFactory.createPanel();
    }

    public String createPageElements(String value){
        return this.panel.paint(value);
    }
}
And here is the use of PageUIManager class:
@Controller
@Scope("prototype")
@RequestMapping("/graphicalpage")
public class PageController {
    @ModelAttribute("pagebody")
    public String pageBody() {
        ResourceBundle rb = ResourceBundle.getBundle("edu.patterns.abstractfactory.theme");
        if (rb.getObject("currentTheme").equals("blue")) {
            return (new PageUIManager(new BluePanleFactory())).createPageElements("This page color will be changed if you set 'currentTheme' key to 'green' value in edu.patterns.abstractfactory.theme file.");
        }
        return (new PageUIManager(new GreenPanelFactory())).createPageElements("This page color will be changed if you change 'currentTheme' key to 'blue' value in edu.patterns.abstractfactory.theme file.");
    }

    @RequestMapping("/view")
    public String View() {
        return "graphicalpage.view";
    }
}

This class checks the resource bundle if decide which panel should be displayed.

5. Bridge
5.1 Pattern Goal
The bridge pattern is a design pattern used in software engineering which is meant to "decouple an abstraction from its implementation so that the two can vary independently".The bridge uses encapsulation, aggregation, and can use inheritance to separate responsibilities into different classes.
When a class varies often, the features of object-oriented programming become very useful because changes to a program's code can be made easily with minimal prior knowledge about the program. The bridge pattern is useful when both the class as well as what it does vary often.
5.2 Pattern Detail
This pattern has four major classes. Please Take a look here:
Abstraction:
    defines the abstract interface
    maintains the Implementor reference
RefinedAbstraction:
    extends the interface defined by Abstraction
Implementor:
    defines the interface for implementation classes
ConcreteImplementor:
    implements the Implementor interface

On the other hands, whenever we have some classes with the same materials(ConcreteImplementor), we can standardize them with an super class(Implementor), then we can make a Bridge to connect and maintain them. We can generalise it because each set of Implementor classes has its own protocols(Abstraction). Finally the bridge implementation classes implement Abstraction class and during its implementation they will follow set of Implementor classes protocol.
5.3 Pattern Sample
We are going to create some components for HTML pages. All of them are containing component. This is the share point of them. I'll show you how to create them with Bridge pattern.
First of all I should define the component standard:
public abstract class Container {
    private Map<String, String> styles;

    protected Container() {
        this.styles = new HashMap<String, String>();
    }

    public void addStyle(String key, String value){
        styles.put(key, value);
    }

    protected String renderStyles(){
        if (!styles.isEmpty()) {
            String[] styleArray = new String[styles.size()];
            int i = 0;
            for (String key : styles.keySet()) {
                styleArray[i++] = key + ":" + styles.get(key);
            }
            return "style='" + org.springframework.util.StringUtils.arrayToDelimitedString(styleArray, ";") + "'";
        }
        return "";
    }
    public abstract String startTag();

    public abstract String endTag();
}
As you see every component classes should implement startTag and endTag method. It also has a style attribute type of List and two usefull method for that: addStyle to add a new style and renderStyle to render the list of styles as HTML styles.
Now its the time to implement the component classes. They should implement Container.
public class Div extends Container {

    public String startTag() {
        return "<div " + renderStyles() + ">";
    }

    public String endTag() {
        return "</div>";
    }
}
public class Paragraph extends Container {
    public String startTag() {
        return "<p " + renderStyles() + ">";
    }

    public String endTag() {
        return "</p>";
    }
}
public class Span extends Container {
    public String startTag() {
        return "<span " + renderStyles() + ">";
    }

    public String endTag() {
        return "</span>";
    }
}
every componets implement its own tag as easy as possible via the two methods wich is determined in super class.
Now its the time of bridge class. It has some fields which will be render as html styles in Container class. So the role of this class is a bridge with client class and Container class. Take a look here:
public abstract class ContainerBridge {
    int width;
    int height;
    String color;
    String backgroundColor;
    int borderWidth;
    String borderColor;
    String borderStyle;

    protected Container implementor;

    protected ContainerBridge(Container implementor) {
        this.implementor = implementor;
    }

    public int getWidth() {
        return width;
    }

    public void setWidth(int width) {
        this.width = width;
        implementor.addStyle("width", (new Integer(width)).toString());
    }

    public int getHeight() {
        return height;
    }

    public void setHeight(int height) {
        this.height = height;
        implementor.addStyle("height", (new Integer(height)).toString());
    }

    public String getColor() {
        return color;
    }

    public void setColor(String color) {
        this.color = color;
        implementor.addStyle("color", color);
    }

    public String getBackgroundColor() {
        return backgroundColor;
    }

    public void setBackgroundColor(String backgroundColor) {
        this.backgroundColor = backgroundColor;
        implementor.addStyle("background-color", backgroundColor);
    }

    public int getBorderWidth() {
        return borderWidth;
    }

    public void setBorderWidth(int borderWidth) {
        this.borderWidth = borderWidth;
        implementor.addStyle("border-width", (new Integer(borderWidth)).toString());
    }

    public String getBorderColor() {
        return borderColor;
    }

    public void setBorderColor(String borderColor) {
        this.borderColor = borderColor;
        implementor.addStyle("border-color", borderColor);
    }

    public String getBorderStyle() {
        return borderStyle;
    }

    public void setBorderStyle(String borderStyle) {
        this.borderStyle = borderStyle;
        implementor.addStyle("border-style", borderStyle);
    }

    public abstract String wrapText(String text);
}
As you see it maintains Componet passed parameter in constructor as a field(implementor) and  in every setter method it adds a new attribute in style of implementor.This class has also an abstract method called wrapText which should be implemented.
Finally we should implement Bridge class. HtmlContainer will do it:
public class HTMLContainer extends ContainerBridge {
    public HTMLContainer(Container implementor) {
        super(implementor);
    }

    public String wrapText(String text) {
        return implementor.startTag() + text + implementor.endTag();
    }
}
As you see in HTML we should start a tag and place our text then close the tag. This class follows this standard and implement it.

Now its the time to use these tage. we do it in BridgeController:
@Controller
@Scope("prototype")
@RequestMapping("/bridgecontroller")
public class BridgeController {
    @ModelAttribute("pagebody")
    public String pageBody() {
        HTMLContainer div = new HTMLContainer(new Div());
        div.setWidth(200);
        div.setHeight(100);
        div.setColor("lightgray");
        div.setBackgroundColor("gray");

        HTMLContainer p = new HTMLContainer(new Paragraph());
        p.setBorderStyle("solid");
        p.setBorderWidth(1);
        p.setBorderColor("black");
        p.setColor("green");
        p.setWidth(200);
        p.setBackgroundColor("orange");

        HTMLContainer span = new HTMLContainer(new Span());
        span.setColor("lightblue");
        span.setBackgroundColor("brown");
        return div.wrapText("this is div tag from bridge pattern. width:200; height:100; Color:lightgray; Background Color:gray")
                + p.wrapText("this is p tag from bridge pattern. width:200; Border Style:solid; Border Width:1; Border Color:black; Color:cyan; Background Color:orange")
                + span.wrapText("this is span tag from bridge pattern. Color:lightblue; BackgroundColor:brown");
    }

    @RequestMapping("/view")
    public String View() {
        return "bridgecontroller.view";
    }

}

3. Facade
3.1 Pattern Goal
The facade pattern is a software engineering design pattern commonly used with Object-oriented programming. The name is by analogy to an architectural facade.
A facade is an object that provides a simplified interface to a larger body of code, such as a class library. A facade can:
  • make a software library easier to use, understand and test, since the facade has convenient methods for common tasks;
  • make code that uses the library more readable, for the same reason;
  • reduce dependencies of outside code on the inner workings of a library, since most code uses the facade, thus allowing more flexibility in developing the system;
  • wrap a poorly-designed collection of APIs with a single well-designed API (as per task needs).
An Adapter is used when the wrapper must respect a particular interface and must support a polymorphic behavior. On the other hand, a facade is used when one wants an easier or simpler interface to work with.
3.2 Pattern Detail
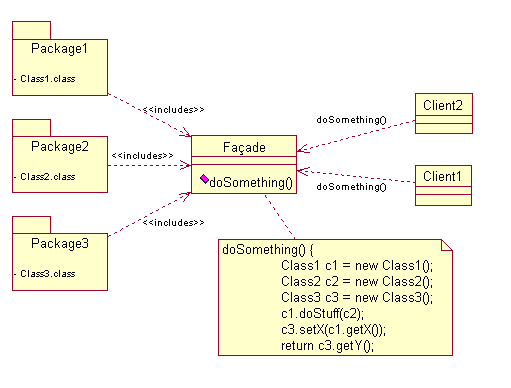
Facade is a simple class which know when and how to create and use other classes and methods of them. Take a look here:
3.3 Pattern Sample
We have a list of people. Suppose that they are our employee so they have these fields:
public class Person {
    Long id;
    String firstname;
    String lastname;
    Long durationTime;
    Long fractionTime;
    Long overtime;
    Long contraction;

    public Long getId() {
        return id;
    }

    public void setId(Long id) {
        this.id = id;
    }

    public String getFirstname() {
        return firstname;
    }

    public void setFirstname(String firstname) {
        this.firstname = firstname;
    }

    public String getLastname() {
        return lastname;
    }

    public void setLastname(String lastname) {
        this.lastname = lastname;
    }

    public Long getDurationTime() {
        return durationTime;
    }

    public void setDurationTime(Long durationTime) {
        this.durationTime = durationTime;
    }

    public Long getFractionTime() {
        return fractionTime;
    }

    public void setFractionTime(Long fractionTime) {
        this.fractionTime = fractionTime;
    }

    public Long getOvertime() {
        return overtime;
    }

    public void setOvertime(Long overtime) {
        this.overtime = overtime;
    }

    public Long getContraction() {
        return contraction;
    }

    public void setContraction(Long contraction) {
        this.contraction = contraction;
    }
}
duration fraction and over times are in minutes and contraction is amount of person salary per hour. PersonSalary is a class wich maintain the person salary:
public class PersonSalary{
    Person person;
    Long salary;

    public PersonSalary(Person person, Long salary) {
        this.person = person;
        this.salary = salary;
    }

    public Person getPerson() {
        return person;
    }

    public void setPerson(Person person) {
        this.person = person;
    }

    public Long getSalary() {
        return salary;
    }

    public void setSalary(Long salary) {
        this.salary = salary;
    }
}
We have claculator class for duration, overtime and fractiontime.
public class DurationCalculator {
    public Long calculate(Person p) {
        return (p.getDurationTime() / 60) * p.getContraction();
    }
}
public class OvertimeCalculator {
    Long overtimeFactor;

    public OvertimeCalculator(Long overtimeFactor) {
        this.overtimeFactor = overtimeFactor;
    }

    public Long calculate(Person p) {
        return (p.getOvertime() / 60) * overtimeFactor * p.getContraction();
    }
}
public class FractiontimeCalculator {
    Long fractiontimeFactor;

    public FractiontimeCalculator(Long fractiontimeFactor) {
        this.fractiontimeFactor = fractiontimeFactor;
    }

    public Long calculate(Person p) {
        return (p.getFractionTime() / 60) * fractiontimeFactor * p.getContraction();
    }
}
the salary formula is: duration salary(duration / 60 * contraction) + overtime salary(overtime / 60 * contraction * overtime factor) - fractiontime salary(fractiontime / 60 * contraction * fractiontime factor)
every parantheses will calculate in calculator class but the facade class is responsible for create these calculator class and summation and subtraction of them:
public class CalculatorFacade {
    public static final Long OVER_TIME_FACTORLONG = 2l;
    public static final Long FRACTMENT_TIME_FACTORLONG = 3l;

    Person person;
    DurationCalculator durationCalculator;
    OvertimeCalculator overtimeCalculator;
    FractiontimeCalculator fractiontimeCalculator;

    public CalculatorFacade(Person person) {
        this.person = person;
        durationCalculator = new DurationCalculator();
        overtimeCalculator = new OvertimeCalculator(OVER_TIME_FACTORLONG);
        fractiontimeCalculator = new FractiontimeCalculator(FRACTMENT_TIME_FACTORLONG);
    }

    public Long calculate() {
        return durationCalculator.calculate(person) + overtimeCalculator.calculate(person) - fractiontimeCalculator.calculate(person);
    }
}
The client class should only create CalculatorFacade and then use the calculate method of it:
@Controller
@Scope("prototype")
@RequestMapping("/employee")
public class EmployeeController {

    public List<PersonSalary> initPersonSalary() {
        List<PersonSalary> personSalaryList = new ArrayList<PersonSalary>();

        Person p1 = new Person();
        p1.setId(1l);
        p1.setFirstname("Jack");
        p1.setLastname("Shepard");
        p1.setContraction(50l);
        p1.setDurationTime(10200l);
        p1.setOvertime(900l);
        p1.setFractionTime(300l);

        Person p2 = new Person();
        p2.setId(2l);
        p2.setFirstname("John");
        p2.setLastname("Luke");
        p2.setContraction(40l);
        p2.setDurationTime(10800l);
        p2.setOvertime(480l);
        p2.setFractionTime(120l);

        Person p3 = new Person();
        p3.setId(3l);
        p3.setFirstname("Mostafa");
        p3.setLastname("Rastgar");
        p3.setContraction(60l);
        p3.setDurationTime(11400l);
        p3.setOvertime(1200l);
        p3.setFractionTime(0l);

        personSalaryList.add(new PersonSalary(p1, 0l));
        personSalaryList.add(new PersonSalary(p2, 0l));
        personSalaryList.add(new PersonSalary(p3, 0l));
        return personSalaryList;
    }

    @ModelAttribute("personList")
    public List<PersonSalary> getPersonList() {
        return initPersonSalary();
    }

    @RequestMapping("/view")
    public String View() {
        return "employee.view";
    }

    @RequestMapping("/calculate")
    public String calculate(@ModelAttribute("personList") List<PersonSalary> personSalaryList) {
        for (PersonSalary p : personSalaryList) {
            CalculatorFacade calculatorFacade = new CalculatorFacade(p.getPerson());
            p.setSalary(calculatorFacade.calculate());
        }
        return View();
    }
}

Source Code

You can download those 3 samples(Abstract Factory, Bridge, Facade) and old 3 samples(Singleton, Decorator, Immutable Class) from here. After the deployment the start page is: http://localhost:8080/button/view.html


all rights reserved by Mostafa Rastgar and Programmer Assistant weblog

Monday, June 27, 2011

Spring Web Service using JAX-WS

Hey ...

Nowadays, most of enterprise applications are linked together to do their jobs. Some of them expose some services, the others use the services which are exposed. Here, the role of web service appears. Here I'm going to explain more about spring-ws using jax-ws and take a simple example.

OK. let's start

1. Spring Web Service

Spring provides full support for standard Java web services APIs:
  • Exposing web services using JAX-RPC
  • Accessing web services using JAX-RPC
  • Exposing web services using JAX-WS
  • Accessing web services using JAX-WS

Why two standard Java web services APIs?
JAX-RPC 1.1 is the standard web service API in J2EE 1.4. As its name indicates, it focuses on on RPC bindings, which became less and less popular in the past couple of years. As a consequence, it has been superseded by JAX-WS 2.0 in Java EE 5, being more flexible in terms of bindings but also being heavily annotation-based. JAX-WS 2.1 is also included in Java 6 (or more specifically, in Sun's JDK 1.6.0_04 and above; previous Sun JDK 1.6.0 releases included JAX-WS 2.0), integrated with the JDK's built-in HTTP server.

Spring can work with both standard Java web services APIs. The choice is effectively dependent on the runtime platform: On JDK 1.4 / J2EE 1.4, the only option is JAX-RPC. On Java EE 5 / Java 6, the obvious choice is JAX-WS. On J2EE 1.4 environments that run on Java 5, you might have the option to plug in a JAX-WS provider; check your J2EE server's documentation.

In addition to stock support for JAX-RPC and JAX-WS in Spring Core, the Spring portfolio also features Spring Web Services, a solution for contract-first, document-driven web services - highly recommended for building modern, future-proof web services. Last but not least, XFire also allows you to export Spring-managed beans as a web service, through built-in Spring support.

As I mentioned, here I'm going to describe more about jax-ws. Here, more details are available about remoting and web services using Spring.

When your application uses Spring for wiring your code, you'll find it more convenient to use the same Spring for configuring JAX-WS. For example, that would allow your service implementations to receive resource injection via Spring, AOP stuff, logging, etc, etc. This RI extension provides this functionality.


2. JAX-WS

This Spring extension also allows you to configure various aspects of your web service through Spring, such as the use of MTOM, handlers, custom transports, encoding, etc., etc.

Another purpose of this extension is to provide a general purpose mechanism that JAX-WS extension authors can use, to let users use their extensions. For example, when you write a custom transport, custom codec, or custom pipeline assembler, you can use Spring to allow users to configure your extensions.

This deployment mechanism supercedes sun-jaxws.xml and JSR-109 deployment.

3. Server Side

Let's consider the most typical case, where you develop a web application and you want to deploy JAX-WS services. First your web.xml needs to have a JAX-WS servlet registered (if servlet could be deployed from Spring without web.xml , we could have gotten rid of this altogether!)
<?xml version="1.0" encoding="UTF-8"?>
<web-app xmlns="http://java.sun.com/xml/ns/javaee"
         xmlns:xsi="http://www.w3.org/2001/XMLSchema-instance"
         xsi:schemaLocation="http://java.sun.com/xml/ns/javaee
          http://java.sun.com/xml/ns/javaee/web-app_2_5.xsd"
         version="2.5">

    <context-param>
        <param-name>contextConfigLocation</param-name>
        <param-value>classpath:spring-ws.xml</param-value>
    </context-param>


    <listener>
        <listener-class>
            org.springframework.web.context.ContextLoaderListener
        </listener-class>
    </listener>

    <servlet>
        <servlet-name>jaxws-servlet</servlet-name>
        <servlet-class>
            com.sun.xml.ws.transport.http.servlet.WSSpringServlet
        </servlet-class>
    </servlet>

    <servlet-mapping>
        <servlet-name>jaxws-servlet</servlet-name>
        <url-pattern>*.ws</url-pattern>
    </servlet-mapping>
</web-app>
I used WSSpringServlet class as major web service servlet. Then I mapped any *.ws to this servlet.

spring-ws.xml is spring context configuration also containing web service configuration.
<?xml version="1.0" encoding="UTF-8"?>
<beans:beans xmlns:beans="http://www.springframework.org/schema/beans"
             xmlns:xsi="http://www.w3.org/2001/XMLSchema-instance"
             xmlns:ws="http://jax-ws.dev.java.net/spring/core"
             xmlns:wss="http://jax-ws.dev.java.net/spring/servlet"
             xmlns:context="http://www.springframework.org/schema/context"
             xsi:schemaLocation="http://www.springframework.org/schema/beans http://www.springframework.org/schema/beans/spring-beans-3.0.xsd
      http://jax-ws.dev.java.net/spring/core
      http://jax-ws.dev.java.net/spring/core.xsd
      http://jax-ws.dev.java.net/spring/servlet
      http://jax-ws.dev.java.net/spring/servlet.xsd http://www.springframework.org/schema/context http://www.springframework.org/schema/context/spring-context.xsd">

    <context:component-scan base-package="com.ws.service"/>

    <wss:binding url="/hello.ws">
        <wss:service>
            <ws:service bean="#helloService"></ws:service>
        </wss:service>
    </wss:binding>

    <wss:binding url="/calculator.ws">
        <wss:service>
            <ws:service bean="#calculatorService"></ws:service>
        </wss:service>
    </wss:binding>

</beans:beans>
The two wss:binding definitions define what services are exposed to which part of the URL space. In the above code, it deploys two services on two URLs(hello, calculator). In "ws:service" tag we should map the specific url to its spring bean. We should determine it on this way: '#'+'bean id'. I have two spring components in spring context including: helloService and calculatorService. component-scan tag would find them.


helloService
package com.ws.service;

import org.springframework.stereotype.Component;

import javax.jws.WebMethod;
import javax.jws.WebParam;
import javax.jws.WebService;
import javax.jws.soap.SOAPBinding;
import javax.jws.soap.SOAPBinding.Style;
import javax.jws.soap.SOAPBinding.Use;

@Component("helloService")
@WebService(serviceName = "Hello",
        portName = "HelloPort",
        targetNamespace = "http://service.ws.com/")
@SOAPBinding(style = Style.RPC, use = Use.LITERAL)
public class HelloService{

    @WebMethod
    public String sayHello(@WebParam(name = "name") String name) {
        return "Hello " + name;
    }

}

calculatorService
package com.ws.service;

import org.springframework.stereotype.Component;

import javax.jws.WebService;
import javax.jws.WebMethod;
import javax.jws.WebParam;
import javax.jws.soap.SOAPBinding;

@Component("calculatorService")
@WebService(serviceName = "Calculator",
        portName = "CalculatorPort",
        targetNamespace = "http://service.ws.com/")
@SOAPBinding(style = SOAPBinding.Style.RPC, use = SOAPBinding.Use.LITERAL)
public class CalculatorService {
    @WebMethod
    public Float add(@WebParam(name = "input1") Float input1, @WebParam(name = "input2") Float input2) {
        return input1 + input2;
    }
    @WebMethod
    public Float subtract(@WebParam(name = "input1") Float input1, @WebParam(name = "input2") Float input2) {
        return input1 - input2;
    }
    @WebMethod
    public Float multiply(@WebParam(name = "input1") Float input1, @WebParam(name = "input2") Float input2) {
        return input1 * input2;
    }
    @WebMethod
    public Float devide(@WebParam(name = "input1") Float input1, @WebParam(name = "input2") Float input2) {
        return input1 / input2;
    }
}

We should determine the serviceName, portName, targetNamespace in WebService annotation to use them in client side code.

Now two web services are ready to use. When you run your server side application, you can find these two web services here:
  • http://localhost:8080/hello.ws
  • http://localhost:8080/calculator.ws

and their WSDL are available here:

  • http://localhost:8080/hello.ws?wsdl
  • http://localhost:8080/calculator.ws?wsdl
4. Client Side
In client side we should define these two beans(hello, calculator) in spring context. But there are no implementation of them. We should bind them via SOAPBinding to the client interface of them. So first we should create these two interfaces:
HelloService
package com.ws.service;

import javax.jws.WebService;
import javax.jws.WebMethod;
import javax.jws.WebParam;
import javax.jws.soap.SOAPBinding;

@WebService
@SOAPBinding(style = SOAPBinding.Style.RPC, use = SOAPBinding.Use.LITERAL)
public interface HelloService {
    public String sayHello(@WebParam(name = "name") String name);
}
CalculatorService
package com.ws.service;

import javax.jws.WebService;
import javax.jws.WebMethod;
import javax.jws.WebParam;
import javax.jws.soap.SOAPBinding;

@WebService
@SOAPBinding(style = SOAPBinding.Style.RPC, use = SOAPBinding.Use.LITERAL)
public interface CalculatorService {
    @WebMethod
    Float add(@WebParam(name = "input1") Float input1, @WebParam(name = "input2") Float input2);

    @WebMethod
    Float subtract(@WebParam(name = "input1") Float input1, @WebParam(name = "input2") Float input2);

    @WebMethod
    Float multiply(@WebParam(name = "input1") Float input1, @WebParam(name = "input2") Float input2);

    @WebMethod
    Float devide(@WebParam(name = "input1") Float input1, @WebParam(name = "input2") Float input2);
}

Then in spring context configuration we should define these two bean on this way:
<?xml version="1.0" encoding="UTF-8"?>
<beans xmlns="http://www.springframework.org/schema/beans"
       xmlns:xsi="http://www.w3.org/2001/XMLSchema-instance"
       xmlns:context="http://www.springframework.org/schema/context"
       xsi:schemaLocation="http://www.springframework.org/schema/beans http://www.springframework.org/schema/beans/spring-beans.xsd http://www.springframework.org/schema/context http://www.springframework.org/schema/context/spring-context.xsd">

    <context:component-scan base-package="com.calculator"/>

    <!--Tiles 2-->
    <bean id="tilesConfigurer" class="org.springframework.web.servlet.view.tiles2.TilesConfigurer">
        <property name="definitions">
            <list>
                <value>/WEB-INF/layout/tiles-config.xml</value>
            </list>
        </property>
    </bean>

    <bean id="tilesViewResolver" class="org.springframework.web.servlet.view.UrlBasedViewResolver">
        <property name="viewClass" value="org.springframework.web.servlet.view.tiles2.TilesView"/>
        <property name="order" value="1"/>
    </bean>

    <!--webservice-->
    <bean id="helloService" class="org.springframework.remoting.jaxws.JaxWsPortProxyFactoryBean">
        <property name="serviceInterface" value="com.ws.service.HelloService"/>
        <property name="wsdlDocumentUrl" value="http://localhost:8080/hello.ws?WSDL"/>
        <property name="namespaceUri" value="http://service.ws.com/"/>
        <property name="serviceName" value="Hello"/>
        <property name="portName" value="HelloPort"/>
    </bean>

    <bean id="calculatorService" class="org.springframework.remoting.jaxws.JaxWsPortProxyFactoryBean">
        <property name="serviceInterface" value="com.ws.service.CalculatorService"/>
        <property name="wsdlDocumentUrl" value="http://localhost:8080/calculator.ws?WSDL"/>
        <property name="namespaceUri" value="http://service.ws.com/"/>
        <property name="serviceName" value="Calculator"/>
        <property name="portName" value="CalculatorPort"/>
    </bean>

</beans>

As you see, we use JaxWsPortProxyFactoryBean. This class will be an instance of the interface which you define in its "serviceInterface" property. "wsdlDocumentUrl", "namespaceUri", "serviceName" and "portName" properties are the values which you determined them in server side. You can also refer to the urls which these web services are exposed.

From now you have two new beans called: "helloService" and "calculatorService". You can autowrie them in your controllers and use them like 'CalculatorController' class
package com.calculator;

import org.springframework.stereotype.Controller;
import org.springframework.context.annotation.Scope;
import org.springframework.web.bind.annotation.RequestMapping;
import org.springframework.beans.factory.annotation.Autowired;
import com.base.BaseController;
import com.ws.service.CalculatorService;

/**
 * User: mostafa
 * Date: Jun 27, 2011
 * Time: 9:19:40 AM
 */
@Controller
@Scope("prototype")
@RequestMapping("/calculator")
public class CalculatorController extends BaseController {
    @Autowired
    CalculatorService calculatorService;

    Float input1;
    Float input2;
    Float result;

    public Float getInput1() {
        return input1;
    }

    public void setInput1(Float input1) {
        this.input1 = input1;
    }

    public Float getInput2() {
        return input2;
    }

    public void setInput2(Float input2) {
        this.input2 = input2;
    }

    public Float getResult() {
        return result;
    }

    public void setResult(Float result) {
        this.result = result;
    }

    public void init() {
    }

    @RequestMapping("/view")
    public String view() {
        return "calculator.view";
    }

    @RequestMapping("/add")
    public String add() {
        result = calculatorService.add(input1, input2);
        return view();
    }

    @RequestMapping("/subtract")
    public String subtract() {
        result = calculatorService.subtract(input1, input2);
        return view();
    }

    @RequestMapping("/multiply")
    public String multiply() {
        result = calculatorService.multiply(input1, input2);
        return view();
    }

    @RequestMapping("/devide")
    public String devide() {
        result = calculatorService.devide(input1, input2);
        return view();
    }

    @RequestMapping("/clear")
    public String clear() {
        return "redirect:view.html";
    }
}

6. Source Code
Here you can download the source code. When you extract zipped file, you will find two projects. You can run server side project (springWS) on port 8080 and client side project(springWSClient) on port 9090 for example. So the urls will be:
  • Server: http://localhost:8080/calculator.ws
  • Client: http://localhost:9090/calculator/view.html
enjoy yourselves
all rights reserved by Mostafa Rastgar and Programmer Assistant weblog