We are going to continue our tour in JSF. In previous post, we discuss about JSF phases and how it works. In this post we are going to continue in more configurations and JSF view tags.
We commence with faces-config.xml. Here is a simple configuration of faces-config.xml:
<?xml version='1.0' encoding='UTF-8'?>

<faces-config xmlns="http://java.sun.com/xml/ns/javaee"

              xmlns:xsi="http://www.w3.org/2001/XMLSchema-instance"

              xsi:schemaLocation="http://java.sun.com/xml/ns/javaee http://java.sun.com/xml/ns/javaee/web-facesconfig_1_2.xsd"

              version="1.2">

    <managed-bean>

        <managed-bean-name>testForm</managed-bean-name>

        <managed-bean-class>com.test.TestForm</managed-bean-class>

        <managed-bean-scope>request</managed-bean-scope>

    </managed-bean>

    <managed-bean>

        <managed-bean-name>studentForm</managed-bean-name>

        <managed-bean-class>com.student.StudentForm</managed-bean-class>

        <managed-bean-scope>request</managed-bean-scope>

    </managed-bean>

    <navigation-rule>

        <from-view-id>/index.jsp</from-view-id>

        <navigation-case>

            <from-outcome>show message</from-outcome>

            <to-view-id>/displayinfo.jsp</to-view-id>

        </navigation-case>

    </navigation-rule>


    <navigation-rule>

        <from-view-id>/displayinfo.jsp</from-view-id>

        <navigation-case>

            <from-outcome>back info</from-outcome>

            <to-view-id>/index.jsp</to-view-id>

            <redirect/>

        </navigation-case>

    </navigation-rule>


    <navigation-rule>

        <navigation-case>

            <from-outcome>update student</from-outcome>

            <to-view-id>/student/studentView.jsp</to-view-id>

        </navigation-case>

        <navigation-case>

            <from-outcome>student list</from-outcome>

            <to-view-id>/student/studentlist.jsp</to-view-id>

            <redirect/>

        </navigation-case>

        <navigation-case>

            <from-outcome>back</from-outcome>

            <to-view-id>/student/studentlist.jsp</to-view-id>

            <redirect/>

        </navigation-case>

    </navigation-rule>


    <lifecycle>

        <phase-listener>com.student.StudentPhaseTracker</phase-listener>

    </lifecycle>

</faces-config>
In this configuration we have 2 managed beans:
- testForm
- studentForm
- application
- none
- request
- session
navigation-rule tag is the tag which we can handle our navigations between pages via this. There are some body tags for it.
- from-view-id: we can specify from which JSP we can have specified navigation. It is not required but if you do not specify it, it means for any JSP you handle subsequent navigation.
- navigation-case: you can determine your navigation by this required tag.
- from-outcome: here you put the action which is returned by action method in managed-bean.
- to-view-id: here you put the JSP address to be forwarded or redirected to it. The default is forward.
- redirect: if you want to redirect to the specified JSP you can use this tag.
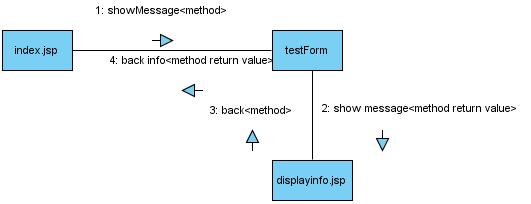
In this sample I had specified “show message” action which is raised from “index.jsp” to forward to “displayinfo.jsp” and “back info” action which is raised from “displayinfo.jsp” to redirect to “index.jsp”.

| JSF Tag | HTML rendered tag |
|---|---|
| h:outputText | span |
| h:inputText | input type="text" |
| h:selectOneMenu | select |
| h:outputLabel | label |
| h:commandButton | input type="submit' |
| h:commandLink | a |
 | ||
| first page |
 |
| second page |
“FacesContext.getCurrentInstance().addMessage” has two parameter:
- message name: It should be "formname:messagename". It is used for "<h:message for="messagename"/>" tag.
- FacesMessage Object: we can create this object any time it is needed. the constructor has 3 parameters: severity(for example FacesMessage.SEVERITY_ERROR), summery, detail.
2. example 2
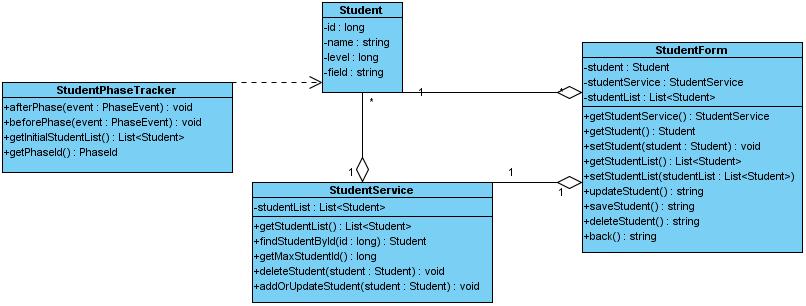
In this example we show you a simple crud. The entity is Student. the class diagram is:

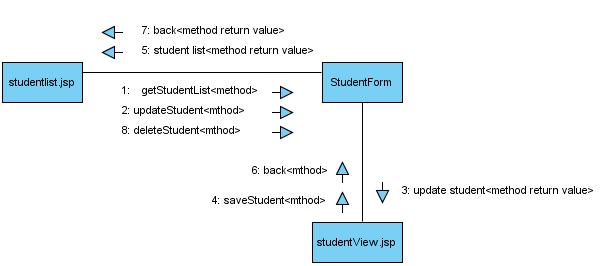
communication diagram is:

 |
| list page |
 | |
| add and update page |
In "faces-config.xml" file we define "phase-listener" to initiate student list. Because I don't use any DBMS so I fill a fix list of Student in session. I do that in "phase-listener". In "phase-listener" tag we should specify a class which implements "PhaseListener" interface. I do this via "StudentPhaseTracker". The class should implements 3 methods:
- afterPhase: After JSF phase is raised.
- beforePhase: Before JSF phase is raised.
- getPhaseId: In this method we should specify in which phases "afterPhase" and "beforePhase" should be raised. we can return "PhaseId.ANY_PHASE" to raise after and before any phases.
In "studentlist.jsp" I used "<h:dataTable>" which should be explained more. "<h:dataTable>" renders dynamic list from a java list that should be specified in value field. We specify record variable in "var" field just like "c:foreach" JSTL tag. In "<h:column>" tag we specify records columns. In "<f:facet>" tag we specify columns header or footer by name field. for example "<f:facet name="header"><t:outputText value="level"/> </f:facet>". In "<h:column>" tag we can use any other JSF tags like "<h:outputText value="#{st.level == 1 ? 'B.S.' : 'M.S.'}"/>".
Other important points about "commandLink" and "commandButton" is the "immediate" field. If we set this to true, these command buttons bypass validation phase. Else validation is checked. It has two fields to invoke server side method.
- action: The method should return string without any method parameters.
- actionListener: This method is called sooner than action method. This method should be void and has one parameter: "ActionEvent" for example: " public void test(ActionEvent e){}".
- property: The property name which should be set.
- value: The value which is set.
<h:commandLink immediate="true" actionListener="" onclick="return confirm('delete this row?');" action="#{studentForm.deleteStudent}" value="delete">

                    <t:updateActionListener property="#{studentForm.student.id}" value="#{st.id}"/>

</h:commandLink>
here you can download the source code. After deploying into your application server (like tomcat), the url of example 1 is: "http://localhost:8080/index.jsf" and example 2 is: "http://localhost:8080/student/studentlist.jsf".
Enjoy yourselves ;)
Enjoy yourselves ;)
all rights reserved by Mostafa Rastgar and prgassist weblog

3 comments:
your blog is nice and useful; but it seems most of your addressee are persian and i think persian version of these tips would be more wanted !!
not farsi blog but farsi version of content;
Good Luck pal;
first: you mean i should post Persian version of my posts in other web log?
second: I am not Persian one ;)!
hi buddy.this tutorial of JSF was very useful to me.enjoyed it.thank u:)
Post a Comment