
Do you remember my past post about design patterns? Here I'm going to continue it.
4. Abstract Factory
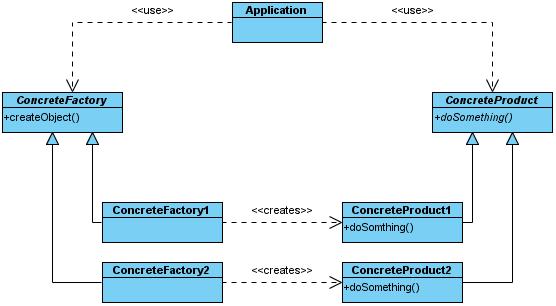
4.1. Pattern Goal
The abstract factory pattern is a software design pattern that provides a way to encapsulate a group of individual factories that have a common theme. In normal usage, the client software creates a concrete implementation of the abstract factory and then uses the generic interfaces to create the concrete objects that are part of the theme. The client does not know (or care) which concrete objects it gets from each of these internal factories since it uses only the generic interfaces of their products. This pattern separates the details of implementation of a set of objects from their general usage.
In software development, a factory is the location in the code at which objects are constructed. The intent in employing the pattern is to insulate the creation of objects from their usage. This allows for new derived types to be introduced with no change to the code that uses the base class.
Use of this pattern makes it possible to interchange concrete implementations without changing the code that uses them, even at runtime. However, employment of this pattern, as with similar design patterns, may result in unnecessary complexity and extra work in the initial writing of code. Used correctly the "extra work" pays off in the second implementation of the factory.
4.2 Pattern Detail
In this pattern we should have 2 kinds of interfaces and classes. 1: Concrete Products 2:Concrete Factories
Please take a look to this class diagram:
4.3 Pattern sample
In this sample we want to have a block to support templates. We place a key property containing template name. When we change the template key to green or blue, the block color should change its color. To do that we need 2 interfaces:
public interface Panel {
    public String paint(String value);
}
public interface PanelFactory {
    public Panel createPanel();
}
public class GreenPanel implements Panel{
    public String paint(String value) {
        return "<div style='border-width:1px; border-color:green; border-style:solid; margin:2px; padding:2px; color:green'>" + value + "</div>";
    }
}
public class BluePanel implements Panel{
    public String paint(String value) {
        return "<div style='border-width:1px; border-color:blue; border-style:solid; margin:2px; padding:2px; color:blue'>" + value + "</div>";
    }
}
public class BluePanleFactory implements PanelFactory{
    public Panel createPanel() {
        return new BluePanel();
    }
}
public class GreenPanelFactory implements PanelFactory{
    public Panel createPanel() {
        return new GreenPanel();
    }
}
public class PageUIManager {
    Panel panel;

    public PageUIManager(PanelFactory panelFactory) {
        this.panel = panelFactory.createPanel();
    }

    public String createPageElements(String value){
        return this.panel.paint(value);
    }
}
@Controller
@Scope("prototype")
@RequestMapping("/graphicalpage")
public class PageController {
    @ModelAttribute("pagebody")
    public String pageBody() {
        ResourceBundle rb = ResourceBundle.getBundle("edu.patterns.abstractfactory.theme");
        if (rb.getObject("currentTheme").equals("blue")) {
            return (new PageUIManager(new BluePanleFactory())).createPageElements("This page color will be changed if you set 'currentTheme' key to 'green' value in edu.patterns.abstractfactory.theme file.");
        }
        return (new PageUIManager(new GreenPanelFactory())).createPageElements("This page color will be changed if you change 'currentTheme' key to 'blue' value in edu.patterns.abstractfactory.theme file.");
    }

    @RequestMapping("/view")
    public String View() {
        return "graphicalpage.view";
    }
}
5. Bridge
5.1 Pattern Goal
The bridge pattern is a design pattern used in software engineering which is meant to "decouple an abstraction from its implementation so that the two can vary independently".The bridge uses encapsulation, aggregation, and can use inheritance to separate responsibilities into different classes.
When a class varies often, the features of object-oriented programming become very useful because changes to a program's code can be made easily with minimal prior knowledge about the program. The bridge pattern is useful when both the class as well as what it does vary often.
5.2 Pattern Detail
This pattern has four major classes. Please Take a look here:

defines the abstract interface
maintains the Implementor reference
RefinedAbstraction:
extends the interface defined by Abstraction
Implementor:
defines the interface for implementation classes
ConcreteImplementor:
implements the Implementor interface
On the other hands, whenever we have some classes with the same materials(ConcreteImplementor), we can standardize them with an super class(Implementor), then we can make a Bridge to connect and maintain them. We can generalise it because each set of Implementor classes has its own protocols(Abstraction). Finally the bridge implementation classes implement Abstraction class and during its implementation they will follow set of Implementor classes protocol.
5.3 Pattern Sample
We are going to create some components for HTML pages. All of them are containing component. This is the share point of them. I'll show you how to create them with Bridge pattern.
First of all I should define the component standard:
public abstract class Container {
    private Map<String, String> styles;

    protected Container() {
        this.styles = new HashMap<String, String>();
    }

    public void addStyle(String key, String value){
        styles.put(key, value);
    }

    protected String renderStyles(){
        if (!styles.isEmpty()) {
            String[] styleArray = new String[styles.size()];
            int i = 0;
            for (String key : styles.keySet()) {
                styleArray[i++] = key + ":" + styles.get(key);
            }
            return "style='" + org.springframework.util.StringUtils.arrayToDelimitedString(styleArray, ";") + "'";
        }
        return "";
    }
    public abstract String startTag();

    public abstract String endTag();
}
Now its the time to implement the component classes. They should implement Container.
public class Div extends Container {

    public String startTag() {
        return "<div " + renderStyles() + ">";
    }

    public String endTag() {
        return "</div>";
    }
}
public class Paragraph extends Container {
    public String startTag() {
        return "<p " + renderStyles() + ">";
    }

    public String endTag() {
        return "</p>";
    }
}
public class Span extends Container {
    public String startTag() {
        return "<span " + renderStyles() + ">";
    }

    public String endTag() {
        return "</span>";
    }
}
Now its the time of bridge class. It has some fields which will be render as html styles in Container class. So the role of this class is a bridge with client class and Container class. Take a look here:
public abstract class ContainerBridge {
    int width;
    int height;
    String color;
    String backgroundColor;
    int borderWidth;
    String borderColor;
    String borderStyle;

    protected Container implementor;

    protected ContainerBridge(Container implementor) {
        this.implementor = implementor;
    }

    public int getWidth() {
        return width;
    }

    public void setWidth(int width) {
        this.width = width;
        implementor.addStyle("width", (new Integer(width)).toString());
    }

    public int getHeight() {
        return height;
    }

    public void setHeight(int height) {
        this.height = height;
        implementor.addStyle("height", (new Integer(height)).toString());
    }

    public String getColor() {
        return color;
    }

    public void setColor(String color) {
        this.color = color;
        implementor.addStyle("color", color);
    }

    public String getBackgroundColor() {
        return backgroundColor;
    }

    public void setBackgroundColor(String backgroundColor) {
        this.backgroundColor = backgroundColor;
        implementor.addStyle("background-color", backgroundColor);
    }

    public int getBorderWidth() {
        return borderWidth;
    }

    public void setBorderWidth(int borderWidth) {
        this.borderWidth = borderWidth;
        implementor.addStyle("border-width", (new Integer(borderWidth)).toString());
    }

    public String getBorderColor() {
        return borderColor;
    }

    public void setBorderColor(String borderColor) {
        this.borderColor = borderColor;
        implementor.addStyle("border-color", borderColor);
    }

    public String getBorderStyle() {
        return borderStyle;
    }

    public void setBorderStyle(String borderStyle) {
        this.borderStyle = borderStyle;
        implementor.addStyle("border-style", borderStyle);
    }

    public abstract String wrapText(String text);
}
Finally we should implement Bridge class. HtmlContainer will do it:
public class HTMLContainer extends ContainerBridge {
    public HTMLContainer(Container implementor) {
        super(implementor);
    }

    public String wrapText(String text) {
        return implementor.startTag() + text + implementor.endTag();
    }
}
Now its the time to use these tage. we do it in BridgeController:
@Controller
@Scope("prototype")
@RequestMapping("/bridgecontroller")
public class BridgeController {
    @ModelAttribute("pagebody")
    public String pageBody() {
        HTMLContainer div = new HTMLContainer(new Div());
        div.setWidth(200);
        div.setHeight(100);
        div.setColor("lightgray");
        div.setBackgroundColor("gray");

        HTMLContainer p = new HTMLContainer(new Paragraph());
        p.setBorderStyle("solid");
        p.setBorderWidth(1);
        p.setBorderColor("black");
        p.setColor("green");
        p.setWidth(200);
        p.setBackgroundColor("orange");

        HTMLContainer span = new HTMLContainer(new Span());
        span.setColor("lightblue");
        span.setBackgroundColor("brown");
        return div.wrapText("this is div tag from bridge pattern. width:200; height:100; Color:lightgray; Background Color:gray")
                + p.wrapText("this is p tag from bridge pattern. width:200; Border Style:solid; Border Width:1; Border Color:black; Color:cyan; Background Color:orange")
                + span.wrapText("this is span tag from bridge pattern. Color:lightblue; BackgroundColor:brown");
    }

    @RequestMapping("/view")
    public String View() {
        return "bridgecontroller.view";
    }

}
3. Facade
3.1 Pattern Goal
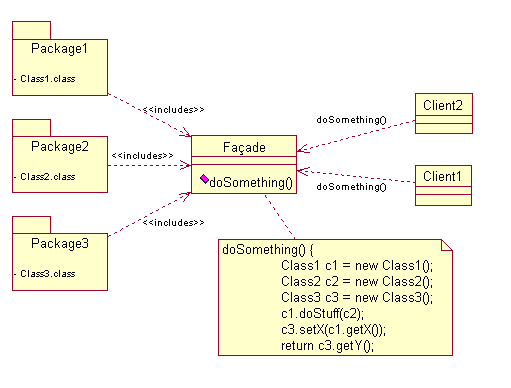
The facade pattern is a software engineering design pattern commonly used with Object-oriented programming. The name is by analogy to an architectural facade.
A facade is an object that provides a simplified interface to a larger body of code, such as a class library. A facade can:
- make a software library easier to use, understand and test, since the facade has convenient methods for common tasks;
- make code that uses the library more readable, for the same reason;
- reduce dependencies of outside code on the inner workings of a library, since most code uses the facade, thus allowing more flexibility in developing the system;
- wrap a poorly-designed collection of APIs with a single well-designed API (as per task needs).
3.2 Pattern Detail
Facade is a simple class which know when and how to create and use other classes and methods of them. Take a look here:
We have a list of people. Suppose that they are our employee so they have these fields:
public class Person {
    Long id;
    String firstname;
    String lastname;
    Long durationTime;
    Long fractionTime;
    Long overtime;
    Long contraction;

    public Long getId() {
        return id;
    }

    public void setId(Long id) {
        this.id = id;
    }

    public String getFirstname() {
        return firstname;
    }

    public void setFirstname(String firstname) {
        this.firstname = firstname;
    }

    public String getLastname() {
        return lastname;
    }

    public void setLastname(String lastname) {
        this.lastname = lastname;
    }

    public Long getDurationTime() {
        return durationTime;
    }

    public void setDurationTime(Long durationTime) {
        this.durationTime = durationTime;
    }

    public Long getFractionTime() {
        return fractionTime;
    }

    public void setFractionTime(Long fractionTime) {
        this.fractionTime = fractionTime;
    }

    public Long getOvertime() {
        return overtime;
    }

    public void setOvertime(Long overtime) {
        this.overtime = overtime;
    }

    public Long getContraction() {
        return contraction;
    }

    public void setContraction(Long contraction) {
        this.contraction = contraction;
    }
}
public class PersonSalary{
    Person person;
    Long salary;

    public PersonSalary(Person person, Long salary) {
        this.person = person;
        this.salary = salary;
    }

    public Person getPerson() {
        return person;
    }

    public void setPerson(Person person) {
        this.person = person;
    }

    public Long getSalary() {
        return salary;
    }

    public void setSalary(Long salary) {
        this.salary = salary;
    }
}
public class DurationCalculator {
    public Long calculate(Person p) {
        return (p.getDurationTime() / 60) * p.getContraction();
    }
}
public class OvertimeCalculator {
    Long overtimeFactor;

    public OvertimeCalculator(Long overtimeFactor) {
        this.overtimeFactor = overtimeFactor;
    }

    public Long calculate(Person p) {
        return (p.getOvertime() / 60) * overtimeFactor * p.getContraction();
    }
}
public class FractiontimeCalculator {
    Long fractiontimeFactor;

    public FractiontimeCalculator(Long fractiontimeFactor) {
        this.fractiontimeFactor = fractiontimeFactor;
    }

    public Long calculate(Person p) {
        return (p.getFractionTime() / 60) * fractiontimeFactor * p.getContraction();
    }
}
every parantheses will calculate in calculator class but the facade class is responsible for create these calculator class and summation and subtraction of them:
public class CalculatorFacade {
    public static final Long OVER_TIME_FACTORLONG = 2l;
    public static final Long FRACTMENT_TIME_FACTORLONG = 3l;

    Person person;
    DurationCalculator durationCalculator;
    OvertimeCalculator overtimeCalculator;
    FractiontimeCalculator fractiontimeCalculator;

    public CalculatorFacade(Person person) {
        this.person = person;
        durationCalculator = new DurationCalculator();
        overtimeCalculator = new OvertimeCalculator(OVER_TIME_FACTORLONG);
        fractiontimeCalculator = new FractiontimeCalculator(FRACTMENT_TIME_FACTORLONG);
    }

    public Long calculate() {
        return durationCalculator.calculate(person) + overtimeCalculator.calculate(person) - fractiontimeCalculator.calculate(person);
    }
}
@Controller
@Scope("prototype")
@RequestMapping("/employee")
public class EmployeeController {

    public List<PersonSalary> initPersonSalary() {
        List<PersonSalary> personSalaryList = new ArrayList<PersonSalary>();

        Person p1 = new Person();
        p1.setId(1l);
        p1.setFirstname("Jack");
        p1.setLastname("Shepard");
        p1.setContraction(50l);
        p1.setDurationTime(10200l);
        p1.setOvertime(900l);
        p1.setFractionTime(300l);

        Person p2 = new Person();
        p2.setId(2l);
        p2.setFirstname("John");
        p2.setLastname("Luke");
        p2.setContraction(40l);
        p2.setDurationTime(10800l);
        p2.setOvertime(480l);
        p2.setFractionTime(120l);

        Person p3 = new Person();
        p3.setId(3l);
        p3.setFirstname("Mostafa");
        p3.setLastname("Rastgar");
        p3.setContraction(60l);
        p3.setDurationTime(11400l);
        p3.setOvertime(1200l);
        p3.setFractionTime(0l);

        personSalaryList.add(new PersonSalary(p1, 0l));
        personSalaryList.add(new PersonSalary(p2, 0l));
        personSalaryList.add(new PersonSalary(p3, 0l));
        return personSalaryList;
    }

    @ModelAttribute("personList")
    public List<PersonSalary> getPersonList() {
        return initPersonSalary();
    }

    @RequestMapping("/view")
    public String View() {
        return "employee.view";
    }

    @RequestMapping("/calculate")
    public String calculate(@ModelAttribute("personList") List<PersonSalary> personSalaryList) {
        for (PersonSalary p : personSalaryList) {
            CalculatorFacade calculatorFacade = new CalculatorFacade(p.getPerson());
            p.setSalary(calculatorFacade.calculate());
        }
        return View();
    }
}
Source Code
You can download those 3 samples(Abstract Factory, Bridge, Facade) and old 3 samples(Singleton, Decorator, Immutable Class) from here. After the deployment the start page is: http://localhost:8080/button/view.html
all rights reserved by Mostafa Rastgar and Programmer Assistant weblog
2 comments:
Learning new technology is like reading a good book, learning patterns is like learning to read
good post
But I hate to read something. I just like to learn.
Post a Comment